

【转】小白自制Linux开发板 七. USB驱动配置
F1c100s芯片支持USB的OTG模式,也就是可以通过更改UsbId拉低或拉高方式定义当前的开发板可以作为host还是device。
usbid 拉高时,开发板作为外设方式。
usbid 拉低时,开发板作为主机方式。
当然除了使用硬件方式,还可以通过Linux系统直接更改当前USB的模式。
1. 原理图
在F1c100s中PE2引脚是作为usbid功能来使用,因为为了使用Sunxi-tool 所以我在画原理图的时候默认将PE2做了上拉处理。
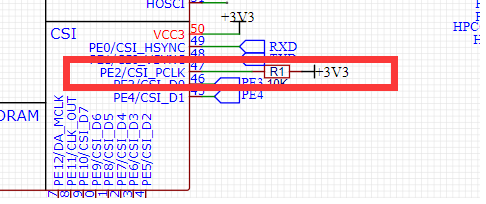
这个芯片只有一个usb引脚
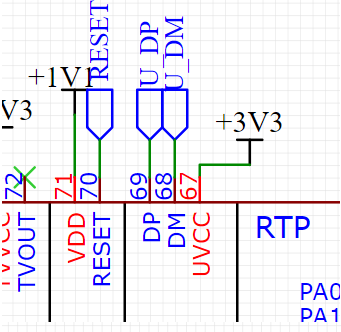
为了可以引出更多的usb外设,所以这里使用了FE8.1这个USB Hub芯片,这个芯片最多可以引出4个Usb接口。具体原理图如下:

2. 设备树与驱动代码配置
硬件处理完成,接下来就是软件部分修改了,打开Linux5.7.1内核源码
2.1 首先修改设备树文件arch/arm/boot/dts/suniv-f1c100s.dtsi文件
在soc节点下增加
usb_otg: usb@1c13000 {
    compatible = "allwinner,suniv-musb";
    reg = <0x01c13000 0x0400>;
    clocks = <&ccu CLK_BUS_OTG>;
    resets = <&ccu RST_BUS_OTG>;
    interrupts = <26>;
    interrupt-names = "mc";
    phys = <&usbphy 0>;
    phy-names = "usb";
    extcon = <&usbphy 0>;
    allwinner,sram = <&otg_sram 1>;
    status = "disabled";
};
usbphy: phy@1c13400 {
    compatible = "allwinner,suniv-usb-phy";
    reg = <0x01c13400 0x10>;
    reg-names = "phy_ctrl";
    clocks = <&ccu CLK_USB_PHY0>;
    clock-names = "usb0_phy";
    resets = <&ccu RST_USB_PHY0>;
    reset-names = "usb0_reset";
    #phy-cells = <1>;
    status = "disabled";
};
2.2 修改arch/arm/boot/dts/suniv-f1c100s-licheepi-nano.dts文件
在文件里面添加
&otg_sram {
        status = "okay";
};&usb_otg {
        dr_mode = "host"; /* 三个可选项: otg / host / peripheral  我在这里指定为host模式*/
        status = "okay";
};&usbphy {
        usb0_id_det-gpio = <&pio 4 2 GPIO_ACTIVE_HIGH>; /* PE2 */
        status = "okay";
};
2.3 修改drivers/phy/allwinner/phy-sun4i-usb.c文件
因为我们在设备树中定义的驱动是suniv-usb-phy,所以我们需要添加这部分代码。
enum sun4i_usb_phy_type {
    suniv_phy,  //新增枚举值    sun4i_a10_phy,
    sun6i_a31_phy,
    sun8i_a33_phy,
    sun8i_a83t_phy,
    sun8i_h3_phy,
    sun8i_r40_phy,
    sun8i_v3s_phy,
    sun50i_a64_phy,
    sun50i_h6_phy,
};
//新增以下结构static const struct sun4i_usb_phy_cfg suniv_cfg = {
.num_phys = 1,
.type = suniv_phy,
.disc_thresh = 3,
.phyctl_offset = REG_PHYCTL_A10,
.dedicated_clocks = true,
};static const struct of_device_id sun4i_usb_phy_of_match[] = {
{ .compatible = "allwinner,suniv-usb-phy", .data = &suniv_cfg }, //新增配置项
{ .compatible = "allwinner,sun4i-a10-usb-phy", .data = &sun4i_a10_cfg },
{ .compatible = "allwinner,sun5i-a13-usb-phy", .data = &sun5i_a13_cfg },
{ .compatible = "allwinner,sun6i-a31-usb-phy", .data = &sun6i_a31_cfg },
{ .compatible = "allwinner,sun7i-a20-usb-phy", .data = &sun7i_a20_cfg },
{ .compatible = "allwinner,sun8i-a23-usb-phy", .data = &sun8i_a23_cfg },
{ .compatible = "allwinner,sun8i-a33-usb-phy", .data = &sun8i_a33_cfg },
{ .compatible = "allwinner,sun8i-a83t-usb-phy", .data = &sun8i_a83t_cfg },
{ .compatible = "allwinner,sun8i-h3-usb-phy", .data = &sun8i_h3_cfg },
{ .compatible = "allwinner,sun8i-r40-usb-phy", .data = &sun8i_r40_cfg },
{ .compatible = "allwinner,sun8i-v3s-usb-phy", .data = &sun8i_v3s_cfg },
{ .compatible = "allwinner,sun50i-a64-usb-phy",
.data = &sun50i_a64_cfg},
{ .compatible = "allwinner,sun50i-h6-usb-phy", .data = &sun50i_h6_cfg },
{ },
};2.4 修改drivers/usb/musb/sunxi.c文件
这里主要处理设备树中定义的驱动suniv-musb。
static int sunxi_musb_probe(struct platform_device *pdev)
{    struct musb_hdrc_platform_data    pdata;    struct platform_device_info    pinfo;    struct sunxi_glue        *glue;    struct device_node        *np = pdev->dev.of_node;    int ret;    if (!np) {
        dev_err(&pdev->dev, "Error no device tree node found\n");        return -EINVAL;
    }
    glue = devm_kzalloc(&pdev->dev, sizeof(*glue), GFP_KERNEL);    if (!glue)        return -ENOMEM;
    memset(&pdata, 0, sizeof(pdata));    switch (usb_get_dr_mode(&pdev->dev)) {#if defined CONFIG_USB_MUSB_DUAL_ROLE || defined CONFIG_USB_MUSB_HOST    case USB_DR_MODE_HOST:
        pdata.mode = MUSB_HOST;
        glue->phy_mode = PHY_MODE_USB_HOST;        break;#endif#if defined CONFIG_USB_MUSB_DUAL_ROLE || defined CONFIG_USB_MUSB_GADGET    case USB_DR_MODE_PERIPHERAL:
        pdata.mode = MUSB_PERIPHERAL;
        glue->phy_mode = PHY_MODE_USB_DEVICE;        break;#endif#ifdef CONFIG_USB_MUSB_DUAL_ROLE    case USB_DR_MODE_OTG:
        pdata.mode = MUSB_OTG;
        glue->phy_mode = PHY_MODE_USB_OTG;        break;#endif
    default:
        dev_err(&pdev->dev, "Invalid or missing 'dr_mode' property\n");        return -EINVAL;
    }
    pdata.platform_ops    = &sunxi_musb_ops;    if (!of_device_is_compatible(np, "allwinner,sun8i-h3-musb"))
        pdata.config = &sunxi_musb_hdrc_config;    else
        pdata.config = &sunxi_musb_hdrc_config_h3;
    glue->dev = &pdev->dev;
    INIT_WORK(&glue->work, sunxi_musb_work);
    glue->host_nb.notifier_call = sunxi_musb_host_notifier;    if (of_device_is_compatible(np, "allwinner,sun4i-a10-musb")||
        of_device_is_compatible(np, "allwinner,suniv-musb")){ //新增判断项代码
        set_bit(SUNXI_MUSB_FL_HAS_SRAM, &glue->flags);
    }    if (of_device_is_compatible(np, "allwinner,sun6i-a31-musb"))
        set_bit(SUNXI_MUSB_FL_HAS_RESET, &glue->flags);    if (of_device_is_compatible(np, "allwinner,sun8i-a33-musb") ||
        of_device_is_compatible(np, "allwinner,sun8i-h3-musb") ||
        of_device_is_compatible(np, "allwinner,suniv-musb")) {  //新增判断项代码
        set_bit(SUNXI_MUSB_FL_HAS_RESET, &glue->flags);
        set_bit(SUNXI_MUSB_FL_NO_CONFIGDATA, &glue->flags);
    }
    glue->clk = devm_clk_get(&pdev->dev, NULL);    if (IS_ERR(glue->clk)) {
        dev_err(&pdev->dev, "Error getting clock: %ld\n",
            PTR_ERR(glue->clk));        return PTR_ERR(glue->clk);
    }    if (test_bit(SUNXI_MUSB_FL_HAS_RESET, &glue->flags)) {
        glue->rst = devm_reset_control_get(&pdev->dev, NULL);        if (IS_ERR(glue->rst)) {            if (PTR_ERR(glue->rst) == -EPROBE_DEFER)                return -EPROBE_DEFER;
            dev_err(&pdev->dev, "Error getting reset %ld\n",
                PTR_ERR(glue->rst));            return PTR_ERR(glue->rst);
        }
    }
    …………
static const struct of_device_id sunxi_musb_match[] = {
{ .compatible = "allwinner,suniv-musb", }, //新增代码
{ .compatible = "allwinner,sun4i-a10-musb", },
{ .compatible = "allwinner,sun6i-a31-musb", },
{ .compatible = "allwinner,sun8i-a33-musb", },
{ .compatible = "allwinner,sun8i-h3-musb", },
{}
};2.5 通过menuconfig配置usb相关的选项
进入:Device Drivers - USB support
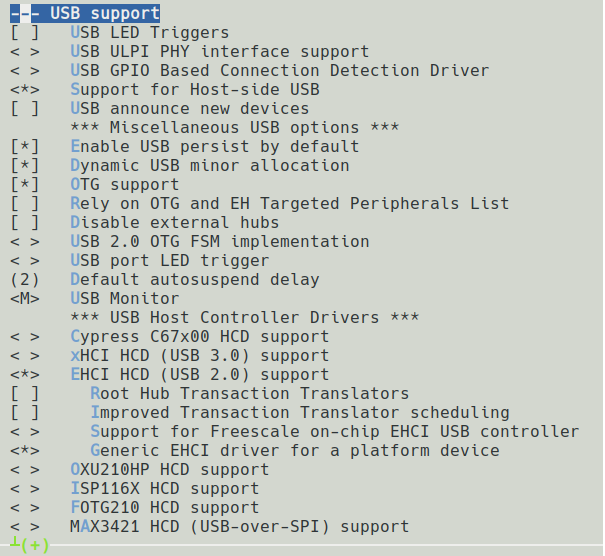
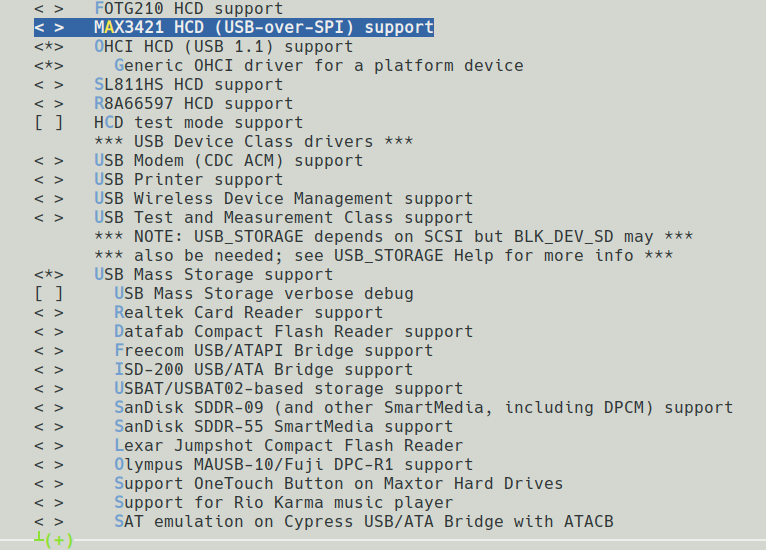
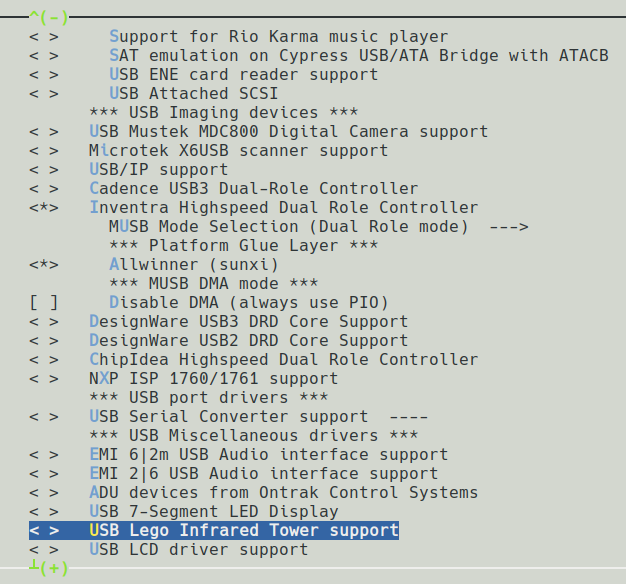
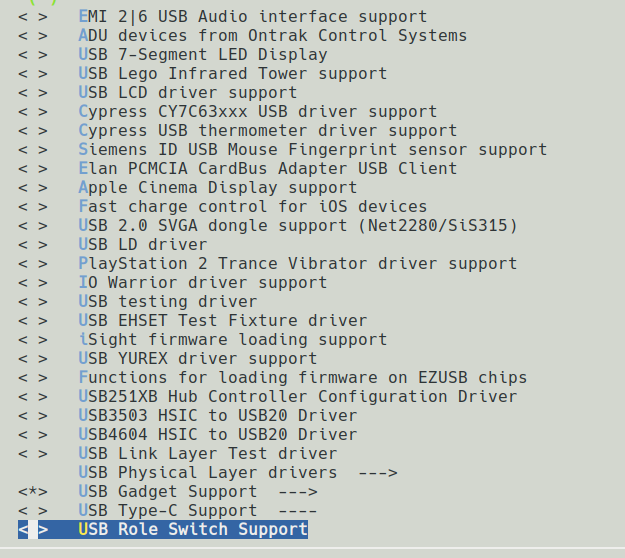
进行配置,当然可以根据自己实际情况进行开启与配置。
接下载编译Linux编译内核和设备树,就可以得到内核文件和设备树文件了。
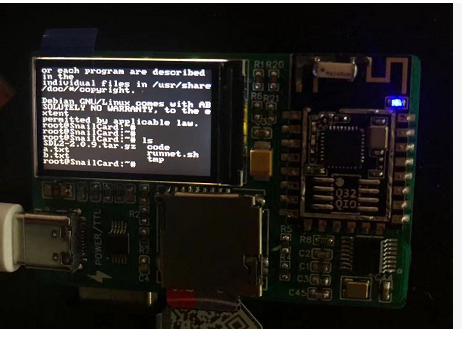
3. 测试USB键盘
这里我默认设置开发板为host模式,然后我要通过usb连接键盘进行输入操作:
[   31.653231] cfg80211: failed to load regulatory.db
[   31.696053] EXT4-fs (mmcblk0p2): mounted filesystem with ordered data mode. Opts: (null)
[   31.707915] VFS: Mounted root (ext4 filesystem) on device 179:2.
[   31.726584] devtmpfs: mounted
[   31.736031] Freeing unused kernel memory: 1024K
[   31.746083] Run /sbin/init as init process
[   32.023410] usb 1-1: new high-speed USB device number 2 using musb-hdrc
[   32.215728] hub 1-1:1.0: USB hub found
[   32.221496] hub 1-1:1.0: 4 ports detected
启动日志中我们可以看到usb已经被检测到,并且检测到4个端口,但是我们只用到两个。
插入键盘。
拔出键盘。

键盘操作开发板:
如果想要进一步了解usb相关的操作,可以借助usbutils相关组件。
首先安装usbutils组件
apt-get install usbutils
安装完成后执行:
lsusb
就可以查看相关usb设备信息了。

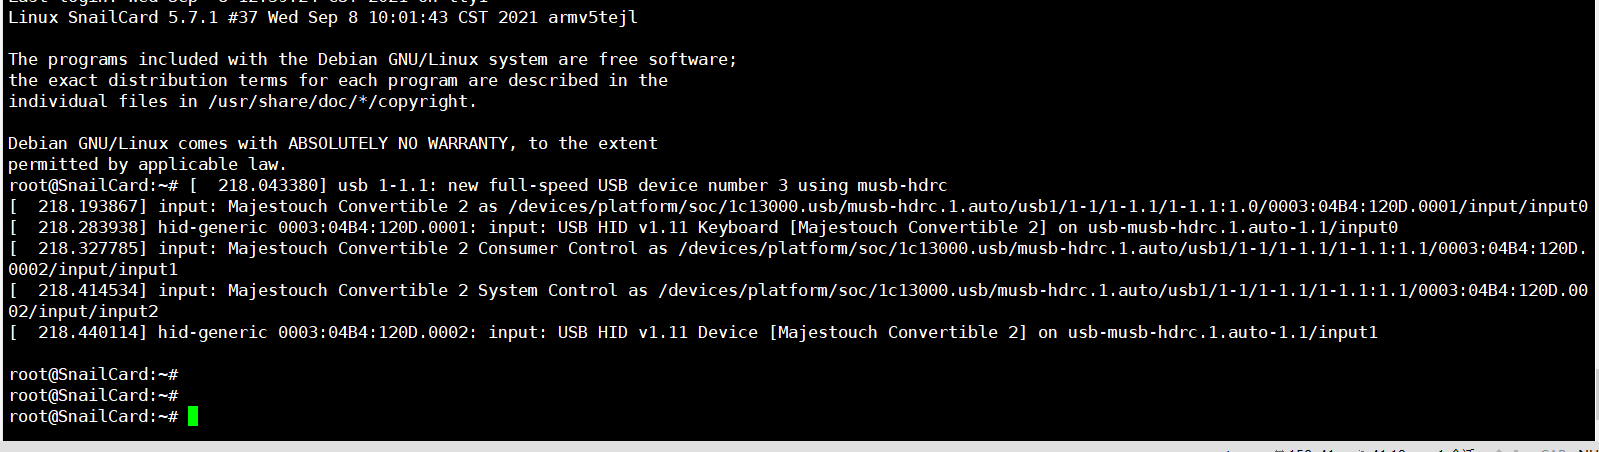
4 通过LINUX方式更改USB属性
首先更改设备树,改为otg模式
&usb_otg {
        dr_mode = "otg"; /* 三个可选项: otg / host / peripheral */
        status = "okay";
};
进入Linux系统,执行,usb将会被设置成为host模式
echo host > /sys/devices/platform/soc/1c13000.usb/musb-hdrc.1.auto/mode
运行结果如下,此时可以插入键盘,就可以使用键盘操作Linux了。
# echo host > /sys/devices/platform/soc/1c13000.usb/musb-hdrc.1.auto/mode
# [117.758152] phy phy-1c13400.phy.0: Changing dr_mode to 1[  118.414817] usb 1-1: new high-speed USB device number 3 using musb-hdrc
[  118.598193] usb-storage 1-1:1.0: USB Mass Storage device detected
[  118.611789] scsi host0: usb-storage 1-1:1.0[  119.686198] scsi 0:0:0:0: Direct-Access     Mass     Storage Device   1.00 PQ: 0 ANSI: 0 CCS
[  119.703976] sd 0:0:0:0: [sda] 3842048 512-byte logical blocks: (1.97 GB/1.83 GiB)
[  119.725260] sd 0:0:0:0: Attached scsi generic sg0 type 0[  119.739844] sd 0:0:0:0: [sda] Write Protect is off
[  119.771819] sd 0:0:0:0: [sda] No Caching mode page found
[  119.777288] sd 0:0:0:0: [sda] Assuming drive cache: write through
[  119.801571]  sda: sda1 sda2 sda3
[  119.817224] sd 0:0:0:0: [sda] Attached SCSI removable disk
如果执行如下命令,则进入设备模式
#
##切换到device模式:
# echo peripheral > /sys/devices/platform/soc/1c13000.usb/musb-hdrc.1.auto/mode
[  123.880272] phy phy-1c13400.phy.0: Changing dr_mode to 2# [  123.890905] usb 1-1: USB disconnect, device number 3
后记
在论坛中用有测试表明,在这个方案配置完USB后,可能无法同时运行两个控制设备,墨云没做相关测试,如果有相关需求的还请注意核实。谢谢
 支付宝打赏
支付宝打赏
 微信打赏
微信打赏