荔枝派Nano的linux5.2版本主线下载及编译(支持USB设备与主机模式)
安装必须的库:
sudo apt-get install gcc make cmake rsync wget unzip build-essential git bc swig libncurses-dev libpython3-dev libssl-dev python3-distutils android-tools-mkbootimg -y
下载与编译linux5.2
下载linux5.2:https://github.com/Lichee-Pi/linux/archive/nano-5.2-tf.zip
解压:
unzip nano-5.2-tf.zip ./
进入linux目录下:
cd linux-nano-5.2-tf
使用荔枝派Nano默认配置:
ARCH=arm CROSS_COMPILE=arm-linux-gnueabi- make sunxi_defconfig ###使用默认配置
编译linux:
ARCH=arm CROSS_COMPILE=arm-linux-gnueabi- make -j4 ###四进程编译
USB驱动补丁
f1c100s linux 5.2 USB已完美驱动,host+device完美运行
usb.patch 代码如下:
diff --git a/arch/arm/boot/dts/suniv-f1c100s-licheepi-nano.dts b/arch/arm/boot/dts/suniv-f1c100s-licheepi-nano.dts
index ca644541a..890a57717 100644
--- a/arch/arm/boot/dts/suniv-f1c100s-licheepi-nano.dts
+++ b/arch/arm/boot/dts/suniv-f1c100s-licheepi-nano.dts
@@ -20,7 +20,7 @@
 	};

 	panel: panel {
-		compatible = "lg,lb070wv8", "simple-panel";
+		compatible = "qiaodian,qd43003c0-40", "simple-panel";
 		#address-cells = <1>;
 		#size-cells = <0>;
 		enable-gpios = <&pio 4 6 GPIO_ACTIVE_HIGH>;
@@ -79,3 +79,17 @@
 	pinctrl-0 = <&uart0_pe_pins>;
 	status = "okay";
 };
+
+&otg_sram {
+	status = "okay";
+};
+
+&usb_otg {
+	dr_mode = "otg";
+	status = "okay";
+};
+
+&usbphy {
+	usb0_id_det-gpio = <&pio 4 2 GPIO_ACTIVE_HIGH>; /* PE2 */
+	status = "okay";
+};
diff --git a/arch/arm/boot/dts/suniv-f1c100s.dtsi b/arch/arm/boot/dts/suniv-f1c100s.dtsi
index 26d8e5577..437bdf7d9 100644
--- a/arch/arm/boot/dts/suniv-f1c100s.dtsi
+++ b/arch/arm/boot/dts/suniv-f1c100s.dtsi
@@ -221,6 +221,31 @@
 			resets = <&ccu RST_BUS_UART2>;
 			status = "disabled";
 		};
+		usb_otg: usb@1c13000 {
+			compatible = "allwinner,suniv-musb";
+			reg = <0x01c13000 0x0400>;
+			clocks = <&ccu CLK_BUS_OTG>;
+			resets = <&ccu RST_BUS_OTG>;
+			interrupts = <26>;
+			interrupt-names = "mc";
+			phys = <&usbphy 0>;
+			phy-names = "usb";
+			extcon = <&usbphy 0>;
+			allwinner,sram = <&otg_sram 1>;
+			status = "disabled";
+		};
+
+		usbphy: phy@1c13400 {
+			compatible = "allwinner,suniv-usb-phy";
+			reg = <0x01c13400 0x10>;
+			reg-names = "phy_ctrl";
+			clocks = <&ccu CLK_USB_PHY0>;
+			clock-names = "usb0_phy";
+			resets = <&ccu RST_USB_PHY0>;
+			reset-names = "usb0_reset";
+			#phy-cells = <1>;
+			status = "disabled";
+		};
 		fe0: display-frontend@1e00000 {
 			compatible = "allwinner,suniv-f1c100s-display-frontend";
 			reg = <0x01e00000 0x20000>;
diff --git a/drivers/phy/allwinner/phy-sun4i-usb.c b/drivers/phy/allwinner/phy-sun4i-usb.c
index 856927382..3cd9e946a 100644
--- a/drivers/phy/allwinner/phy-sun4i-usb.c
+++ b/drivers/phy/allwinner/phy-sun4i-usb.c
@@ -98,6 +98,7 @@
 #define POLL_TIME			msecs_to_jiffies(250)

 enum sun4i_usb_phy_type {
+	suniv_phy,
 	sun4i_a10_phy,
 	sun6i_a31_phy,
 	sun8i_a33_phy,
@@ -859,6 +860,14 @@ static int sun4i_usb_phy_probe(struct platform_device *pdev)
 	return 0;
 }

+static const struct sun4i_usb_phy_cfg suniv_cfg = {
+	.num_phys = 1,
+	.type = suniv_phy,
+	.disc_thresh = 3,
+	.phyctl_offset = REG_PHYCTL_A10,
+	.dedicated_clocks = true,
+};
+
 static const struct sun4i_usb_phy_cfg sun4i_a10_cfg = {
 	.num_phys = 3,
 	.type = sun4i_a10_phy,
@@ -973,6 +982,7 @@ static const struct sun4i_usb_phy_cfg sun50i_h6_cfg = {
 };

 static const struct of_device_id sun4i_usb_phy_of_match[] = {
+	{ .compatible = "allwinner,suniv-usb-phy", .data = &suniv_cfg },
 	{ .compatible = "allwinner,sun4i-a10-usb-phy", .data = &sun4i_a10_cfg },
 	{ .compatible = "allwinner,sun5i-a13-usb-phy", .data = &sun5i_a13_cfg },
 	{ .compatible = "allwinner,sun6i-a31-usb-phy", .data = &sun6i_a31_cfg },
diff --git a/drivers/usb/musb/sunxi.c b/drivers/usb/musb/sunxi.c
index 832a41f9e..83f3fa5b0 100644
--- a/drivers/usb/musb/sunxi.c
+++ b/drivers/usb/musb/sunxi.c
@@ -714,14 +714,17 @@ static int sunxi_musb_probe(struct platform_device *pdev)
 	INIT_WORK(&glue->work, sunxi_musb_work);
 	glue->host_nb.notifier_call = sunxi_musb_host_notifier;

-	if (of_device_is_compatible(np, "allwinner,sun4i-a10-musb"))
+	if (of_device_is_compatible(np, "allwinner,sun4i-a10-musb") ||
+	    of_device_is_compatible(np, "allwinner,suniv-musb")) {
 		set_bit(SUNXI_MUSB_FL_HAS_SRAM, &glue->flags);
+	}

 	if (of_device_is_compatible(np, "allwinner,sun6i-a31-musb"))
 		set_bit(SUNXI_MUSB_FL_HAS_RESET, &glue->flags);

 	if (of_device_is_compatible(np, "allwinner,sun8i-a33-musb") ||
-	    of_device_is_compatible(np, "allwinner,sun8i-h3-musb")) {
+	    of_device_is_compatible(np, "allwinner,sun8i-h3-musb") ||
+	    of_device_is_compatible(np, "allwinner,suniv-musb")) {
 		set_bit(SUNXI_MUSB_FL_HAS_RESET, &glue->flags);
 		set_bit(SUNXI_MUSB_FL_NO_CONFIGDATA, &glue->flags);
 	}
@@ -812,6 +815,7 @@ static int sunxi_musb_remove(struct platform_device *pdev)
 }

 static const struct of_device_id sunxi_musb_match[] = {
+	{ .compatible = "allwinner,suniv-musb", },
 	{ .compatible = "allwinner,sun4i-a10-musb", },
 	{ .compatible = "allwinner,sun6i-a31-musb", },
 	{ .compatible = "allwinner,sun8i-a33-musb", },
打补丁
patch -p1 < usb.patch
配置文件.config下载(包括已编译好的可以镜像、设备树)
重新编译dtb
make ARCH=arm CROSS_COMPILE=arm-linux-gnueabi- dtbs -j4
重新编译内核
make ARCH=arm CROSS_COMPILE=arm-linux-gnueabi- -j8#请自行修改编译线程数
make ARCH=arm CROSS_COMPILE=arm-linux-gnueabi- -j8 INSTALL_MOD_PATH=out modules#请自行修改编译线程数
make ARCH=arm CROSS_COMPILE=arm-linux-gnueabi- -j8 INSTALL_MOD_PATH=out modules_install#请自行修改编译线程数
下载到TF卡运行(如下图):
uboot和文件系统自行安装到tf卡。
HOST模式测试(如下图):
插入U盘
设备模式测试(如下图):
1、PC端设置
USB线连接PC(linux主机,Windows没找到驱动),如下:
右键点击连接
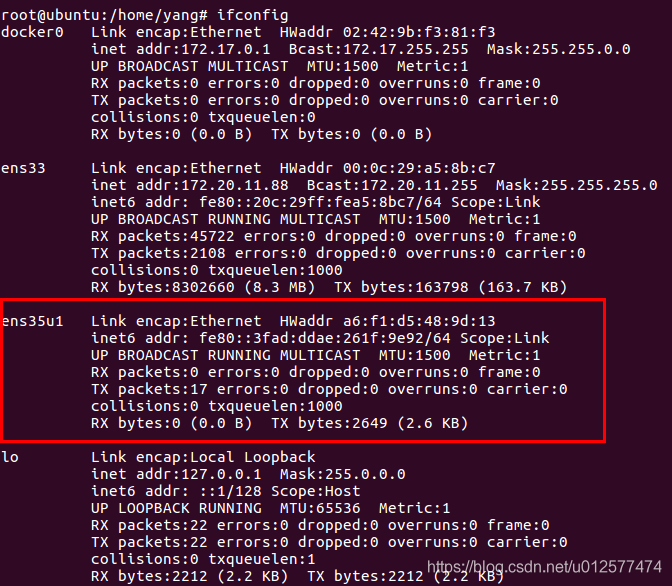
ifconfig -a 查看当前网卡,看到多了一个网卡ens35u1。
ens35u1为设置IP:
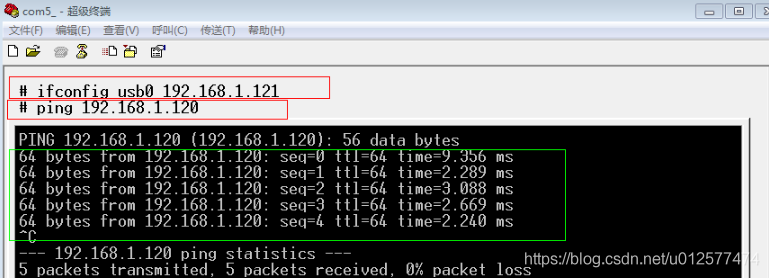
ifconfig ens35u1 192.168.1.120
2、F1C100S板子端设置


 支付宝打赏
支付宝打赏  微信打赏
微信打赏 


